Keeping your bass boat alive, part 11

If the seats in your bass boat are worn, torn and ratty, here’s how to replace them with new seats.

<em>All photos and captions by Mark Hicks</em><p>
<em>REPLACING SEATS</em><br>
If the seats in your bass boat are worn, torn and ratty, here’s how to replace them with new seats that look hot.<p>
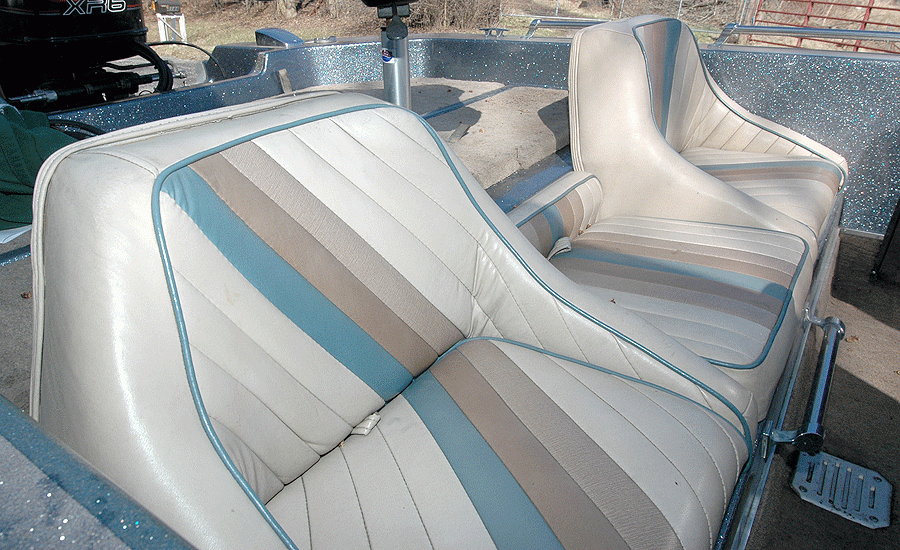
The wood in the driver’s seat of my 1990 Champion 184 had rotted and provided little support. It was time to upgrade. I ordered an awesome set of matching bench seats and a fishing chair from bassboatseats.com. This company offers seats in a variety of styles and sizes to fit most any bass boat.
All photos and captions by Mark Hicks
REPLACING SEATS
If the seats in your bass boat are worn, torn and ratty, here’s how to replace them with new seats that look hot.
The wood in the driver’s seat of my 1990 Champion 184 had rotted and provided little support. It was time to upgrade. I ordered an awesome set of matching bench seats and a fishing chair from bassboatseats.com. This company offers seats in a variety of styles and sizes to fit most any bass boat.
An electric drill with a Phillips screwdriver bit made short work of removing the original seats. Here’s my boat’s bench after the seats have been removed. As you can see, I had some issues with the raised areas on the bench.
Beneath the raised area under the passenger and driver’s seats is a forward gas tank. Between these seats is a cooler.
The raised areas on the bench prevented the new seats from resting flush on the bottom. If the bench on your boat is flat, the installation will be much less challenging than mine was.
Another issue with the new seats is that they extend past the bench. There is nowhere to attach the hinges on the bottom of the seats that secure them to the bench. The seats came from bassboatseats.com with the hinges attached. Not all boats require hinges.
I traced the base of the new seats onto a piece of cardboard to serve as a template. I cut out the center of the template to make room for the raised areas on the bench. Next I traced the template onto a piece of 3/4-inch exterior plywood.
Then I cut out the plywood with an electric, handheld jigsaw.
The plywood was flush with the raised area on the bench, which made for a flat surface. Because the plywood extended beyond the boat’s bench, it provided full support for the seat.
Here’s the new seat resting on the plywood base. The fit looks good.
I added a second layer of 3/4-inch plywood under the portion of the base that extended past the bench. Note that the inner edge of this piece rests against the edge of the bench, which provides additional support.
The middle fold-down seat that covers the cooler did not extend past the bench. Two pieces of 3/4-inch plywood provided the flat surface needed for a proper fit.
Here’s the middle seat in place on the cooler with the plywood supports. Next I sealed the plywood supports and bases with exterior paint and covered them with the same carpet I used to re-carpet the rest of the boat.
The only place I could anchor the wood bases with long screws was a 2-inch wide strip on the front of the bench’s top ledge. This area is backed with wood.
I drilled pilot holes through the bases and into the 2-inch wide strip on the front of the bench’s top ledge.
Then I secured the front of the bases for all three seats with stainless steel screws.
The base in front of the cooler is secured with long screws. I secured the base in the back with steel L brackets and short stainless steel screws that would not penetrate the livewell behind the bench or the cooler below it. There is no wood behind the fiberglass in these areas.
I also used L brackets to anchor the rear portion of the bases for the driver and passenger seats. Again, I used short stainless steel screws to avoid puncturing the livewell behind the bench and the gas tank below it.
With the bases firmly installed, I secured the hinges that came on the seats to the bases with stainless steel screws. The seats are solidly in place, yet can be tilted forward for access to the openings in the bench.
Removing four screws detached the pedestal from the old seat. (I already had a gray pole seat on the front deck, which I decided to keep.)
The same four screws fixed the pedestal to the new seat.
Here’s my 25-year-old bass boat with the new seats installed. Quite an improvement don’t you think?